
As my Father-in-law would say "Lord hates a coward". Let's open her up and see what we got goin' on.

As a precursor I should again explain that I'm not a technician, nor do I have experience ripping engines apart. I'm simply a guy (or a simple guy, your choice) who likes to try and do things on his own. There's lots of help available, like on-line manuals and repair books and articles that are very informative. You can do the stuff I'm doing as well. Changing the gaskets and seals (as you'll see below) isn't all that difficult. Just take your time. Place all the parts in separate areas and label them if you have to so you'll put them back in their respective and appropriate places. If you need to, make a drawing of the piece (or pieces) you're removing or even take sequential pictures or video. Who cares what anyone else thinks of how you do it... the bottom line is you did it yourself. The sense of accomplishment and pride you'll feel, will more than outweigh some morons opinion of your mechanical skills.

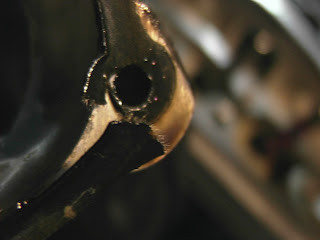
Front rocker top off.

This seal looks fine, but I'll change it anyway because I just happen to have an extra one kickn' around. I changed the rear top rocker seal over the winter when I had the bike apart. There was a small oil leak near the rear exhaust port (nothing in comparison to this front rocker leak).

If that seal's good... that means we gotta go deeper. Down another layer to the gasket.

With the lower rocker section off, let's flip her over and see... whuz uuuuuuuuuuup.

Holy shredded paper gaskets Batman!


Just look at the size of it... that's the most foul, cruel, and bad-tempered gasket you ever set eyes on (Sorry. Sorryyy, Monty Python humour)!

Zoiks Scoob, that's a real tear. All right, enough already... back to the task at hand.
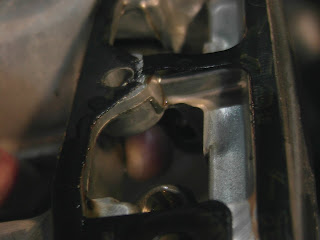
Take a look at that, you might say it's a double whammy. That's the other side and she ain't doing much better. Another clean tear.

Ah huh, this is the area wear the gasket was compromised. A real gusher. Black gold... Texas tea.

Here's the new gasket I picked up from the friendly folks at my local H-D shop. It's one solid piece and it's made of steel wrapped in, what feels like, a light rubber layer. It's a new design because the O.G. 98' gasket was paper and there were two of them.
Chuck (the parts guru) says this model year gasket has gone through a few changes over the years, to improve it's durability and dependability. In other words... ya, there was a design flaw and the old gaskets didn't hold up to the wear & tear of everyday ridin'. Now they think they got it right. We'll soon see.

These old dog dishes will work great for screws and bolts and for washing parts.


But, first it's time to scrape off the remnants of the old paper gaskets. It took a while because I didn't want to scratch, scrape or damage to aluminum casings.

Now scrub-a-dub-dub in da tub! The dog dish is a little small, but it'll do the trick.
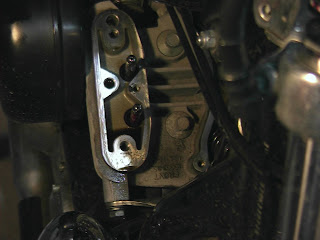
Looks clean, let's button her up.

The gasket fits and as I've mentioned before (in previous posts) I'm no mechanic, so I'm just gonna take my time putting things back together. Reverse the steps and use the torque wrench where required.


Make sure all the rubber seals and gaskets are in place.


Ummmmm, still rainin'. I'm not necessarily a 'fair weather rider', but I'm spent.
Time for a wobbly pop! And hey.... when I do get back from my ride, I won't have to park over a greasy old shop rag. I hope.
Ace ♠


No comments:
Post a Comment